| ||||||||||||||||||||
|
Inbox: New Portal Navigation Options New Portal Navigation Menu on Client Portal
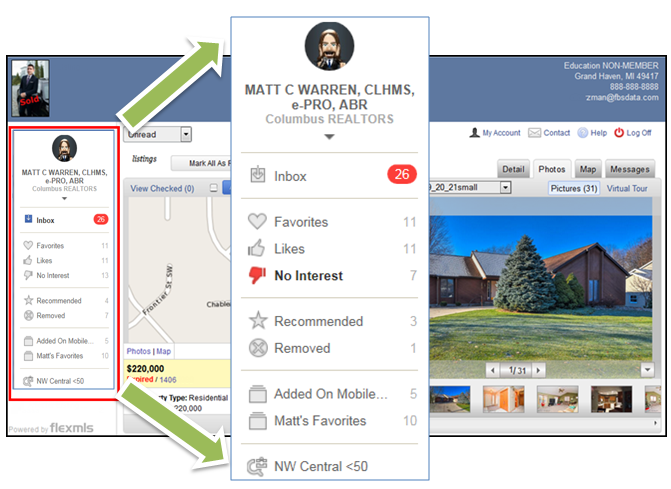
When your clients view listings in the Client Portal, the new portal navigation menu will appear along the left side of the screen providing easy access to listings they have received via auto email, listing collections, saved searches, and manually emailed listings. They will no longer have to click a menu button to access those options. Click on a menu item to see listings in that section.
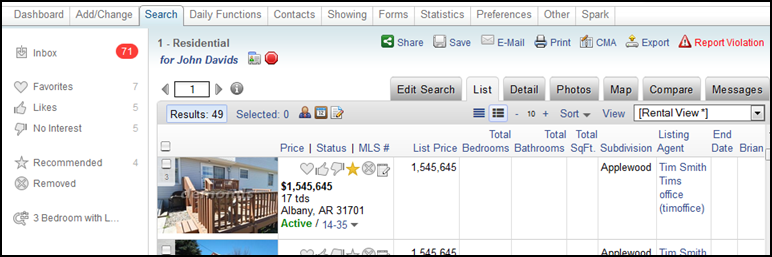
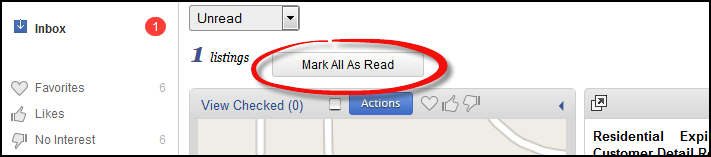
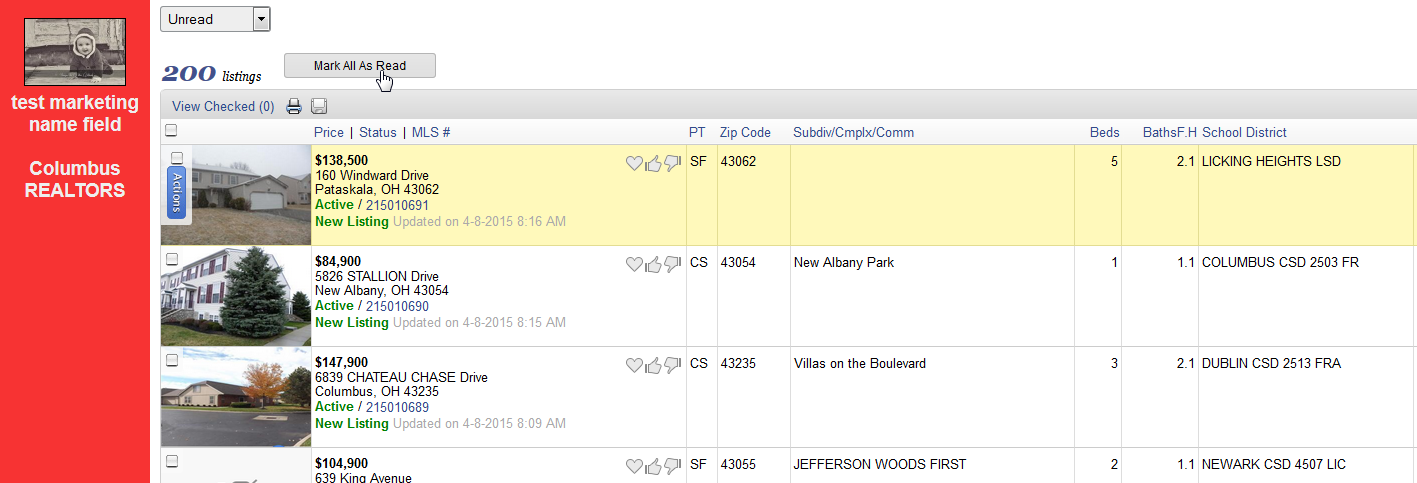
You will also see a contact’s portal menu when you work on behalf of a contact in Flexmls. This will allow you to view your contact’s emailed listings, searches, and listing collections from any search results screen. Please note, when you are working on behalf of a contact and select an item from the portal menu, the menu item will not open in a new tab. Instead, the current search results page will be replaced with the page you selected from the portal menu. Inbox If they would like to see all listings, they can select All from the Notifications drop down menu. Unread Listings become flagged as Read once the contact has clicked to view the Detail tab for the listing. The contact can also manually mark Unread Listings as read by clicking the Mark All As Read button when viewing listings in the Inbox.
You can also manually Mark All As Read for your client on their portal (assuming your client doesn’t understand how or is uncomfortable clicking “Mark All As Read” themselves). When logged in AS THE AGENT:
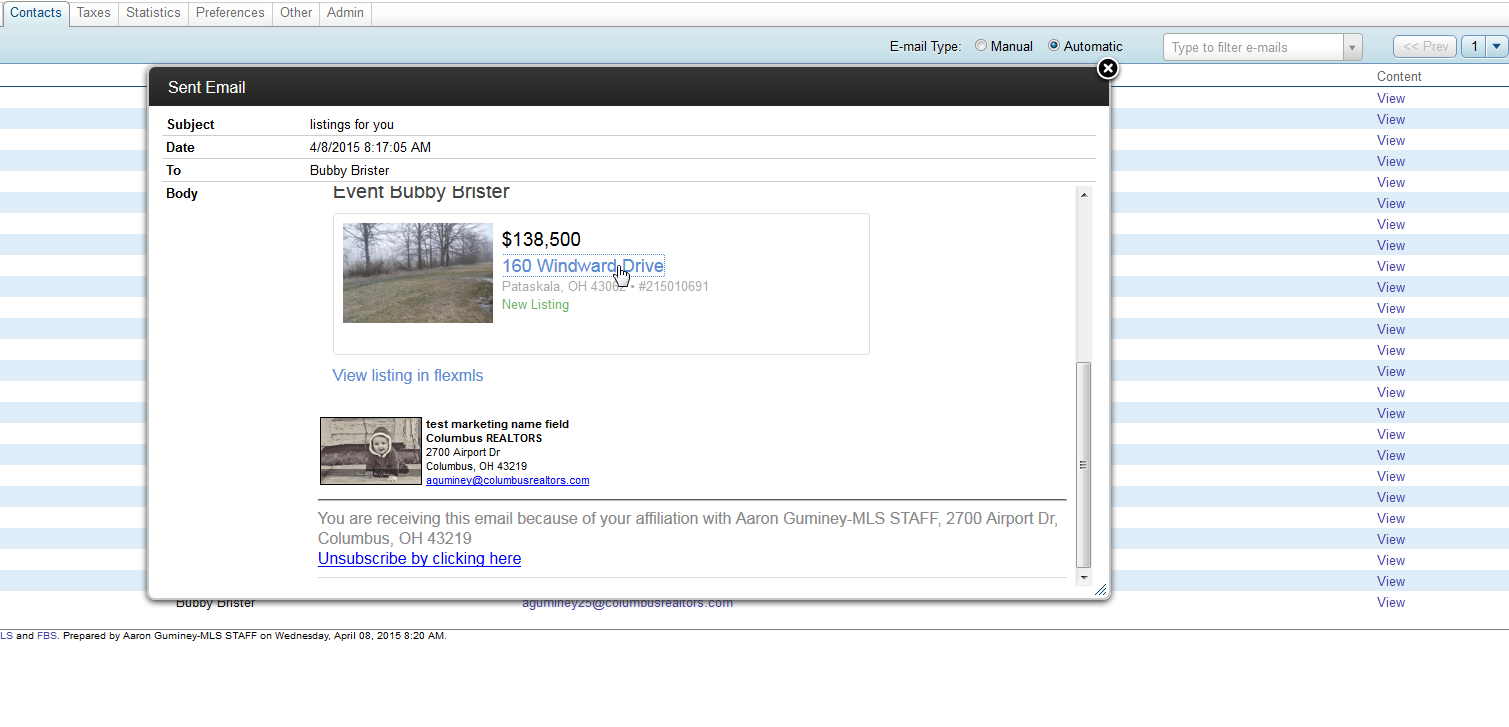
In Flexmls got to Contacts->My Sent Emails. Click the Automatic Bubble.
Under the Content column at the top right, click view. Next, click the address of one listing in the box that appears.
The listings will now display. Click Mark All As Read at the top of the list.
| ||||||||||||||||||||
|
Redux: Flex Mail Update to New Email System Rescheduled for April 6 – 12pm Our MLS vendor, FBS, has informed us that the planned upgrade to the new Flex email system did not complete as expected on March 18. The upgrade has been rescheduled for Monday, April 6, 2016 at 12pm. All MLS email on Flex will move to the new system at that time. Expect email “anomalies” during the day and evening of March 18 as the conversion progresses. No downtime or system inaccessibility is expected. Known Issue to Expect: A known issue that has been reported with previous conversions is duplication of some emails sent from the MLS. Since there will effectively be 2 email systems working at the same time during the conversion, you and your client may receive the email notice twice (once from the old and once from the new email system). Benefits of the new Flexmls email system: The new FBS email system will make all email work with the “notify checkbox” that appeared on the contact manager last month. Until the conversion, only ASAP email recognized additional email on the contact manager. Only the first, primary email address would receive notifications if Weekly or Monthly email notification was selected. On March 19, all email will recognize the notify checkbox and send to all “notify-selected” listings. Another feature with the new email system will be the way listings are delivered to your client. The “newsfeed” delivery used by the ASAP email will now be used for all Auto-email from flex. That basically means that the email sent to the client will contain a link as it always has. The link will now take the client to a Flex page that lists the last 200 listings that were emailed to the client, with the most recent listings at the top. This is the same as the current function for ASAP email. The new system will also show all sent email from ASAP, Weekly, and Monthly email sent to clients on the My Sent Email page where you will be able to click a link to view the listings sent to your contact. The Inbox, at the top of the menu in client portals and when working on behalf of a client, will now show all listings that have been sent to your contact via auto email (currently it only shows those listings sent via ASAP auto email). The number next to the Inbox indicates the number of listings that the contact has not viewed; these listings are referred to as Unread. When your contact clicks on the Inbox, they will see only Unread listings by default. Unread Listings become flagged as Read once the contact has clicked to view the Detail tab for the listing. The contact can also manually mark Unread Listings as read by clicking the Mark All As Read button when viewing listings in the Inbox. If your contact would like to see all listings sent via auto email in the Inbox, they can select All from the Notifications drop down menu. As of April 6 after conversion, all sent email will be unified on the new email system.
| ||||||||||||||||||||
|
New Selections for Residential Listings: 55+ Community and Tenant Occupied Two new items have been added to the Residential property type in the MLS: 1) 55+ Community – in the Additional Acceptance Conditions field 2) Tenant Occupied Y/N – appears directly below Auction Date when adding a new listing Note on Limited Searchability for new listing fields:
| ||||||||||||||||||||
|
Update Your Listings for “Tax (Yrly)” and “Tax Year” It’s that time of year again to update your listings with the latest property tax information so they are reflective of the 2014 tax year. Most county auditors have updated their tax records to reflect the taxes owed for each parcel in their taxing districts for the 2014 tax year. Voter approved school and bond levies impact those figures usually each year along with any auditor reassessments or owner appeals of property valuation. Since most real estate taxes change annually, it is important that REALTORS®, clients and even sellers be kept apprised of these ever changing figures. While Realist can be used to auto-populate the Tax (Yrly) and Tax Year when you first enter the listing, it does not and cannot automatically update them for you when those figures change. It is very important that REALTORS® manually update tax data on their existing listings at the beginning of each year. Important Note for Realist Auto-population: New Listings are auto-populated with the previous year’s tax data for several months of the following year (until the Realist tax roll update occurs). Realist tax roll updates occur only once a year. This usually occurs around April or May for Franklin county, but can take much longer in other counties around central Ohio. The new listing will have out-of-date tax data in Tax (Yrly) and Tax Year for several months after the new Auditor tax data is available on the Auditor website. This makes manual verification and update of tax data by the listing agent even more important. Please verify that your tax information is accurate today on the Auditor’s website.
| ||||||||||||||||||||
|
Realist PDF’s Should Now Be Available Realisthas reported that the issue with PDF’s while saving, printing or emailing reports has now been resolved.
| ||||||||||||||||||||
|
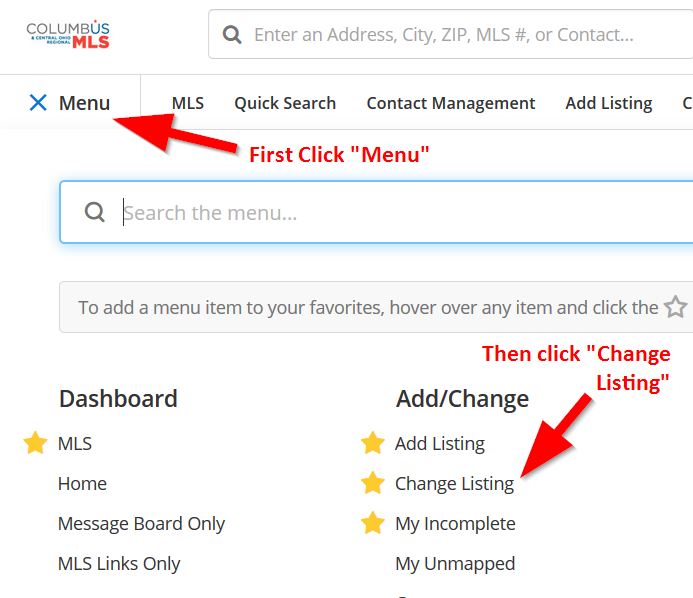
Adding / Removing Contingency Information to a Listing – HowTo Guide Adding or removing a contingency for your listing is actually quite easy within the Flexmls system. The process is a bit different than was with the previous MLS systems, but the idea is the same in the fact that you must provide what type of contingency is involved and the reason. To add a contingency, a listing must currently be in the Active status. To make a listing go from “Contingent” to “Active” (or to remove a contingency), you use the same “Add/Remove Contingency” button to make it Active again by removing the contingency. Below are some basic steps to the process: 1. First, click the “Menu” button. Then click “Change Listing”. 2. Next, find the listing needing to be changed and click on the MLS # for that listing: 3. On the change screen for that listing, you’ll find available under the left hand side Status and Price Change section an option to Add/Remove Contingency. 4. Clicking on this option will present you with the following screen. From here, you must select the appropriate contingency status and then provide the reason. If you are changing the status from Contingent to Active (remove a contingency), select “No Contingency”. For Contingent Escape, “Sale of Home” will be entered in the Contingency Reason field for you. Once the options are filled in, you’ll want to hit NEXT to proceed: 5. You will then be asked to confirm the action. Hitting BACK will allow you to go back a step to revisit the entered information from the previous screen or hitting NEXT will process the status change: 6. After this is performed, you will then be brought back to the Change Screen for the listing. You are now done and can make further adjustments to the listing or go to another section within Flexmls. 7. To REMOVE a contingency, you repeat steps 1-5, but you will be changing the Contingent field in step 4 back to “NO CONTINGENCY”. This will remove the reason and allow you to hit NEXT. Continue to step 5 and confirm the change. Once performed, this listing will be returned to a full ACTIVE status. Original Post Date: 5/16/2014
| ||||||||||||||||||||
|
New Photo Upload Page and features enabled for all listings. ** Watch our new video on utilizing the new photo upload tool ** : https://vimeo.com/user7213738/review/122443106/2d0638cf70
On March 9th, 2015, the photo upload page within Flexmls was updated. The new photo page will make it even easier for you to rearrange your photos and add titles and captions. To access the photo add/edit page, click on Photos under the Multimedia section on the Change Listing screen or the Change Incomplete Listing screen.Add Photos Then browse your computer’s files to find and select the photos you would like to add. Remember, you can select multiple photos by holding down the Control key (hold the Command key on a Mac) and clicking on the photos you would like to select. See the image below for what multiple selected photos appears like on a Windows based computer (note the blue highlight) Click Open to add the photos to the listing. Edit Photos Rearrange Photos Another option to rearrange the photos is to click the drop-down arrow by the number in the upper left corner of each photo. Then click the number of the position you want the photo to occupy. Add Titles and Captions Adding or changing a caption for a photo follows the same process using the caption bar at the bottom of the photo. Hover over the caption bar and click the Pencil icon to add or edit a caption. Save any changes you make by clicking the green Save icon. Designate a Primary Photo Rotate Photos Replace Photos Remove Photos When you are finished adding and editing photos, click the Return to edit your listing link in the upper left corner of the page. All updates that you’ve made to the listing’s photos will be saved automatically.
If you wish to use the old style photo upload tool, you can click on the wording “Original Photo Upload” that is available on the upper right side of the screen. This will change the view back to the older photo page.
| ||||||||||||||||||||
|
EXTENDED REALIST DOWNTIME: Friday, March 13, 9pm through Sunday, March 15, 10am Realist will be completely inaccessible Friday evening into Sunday morning. Please plan accordingly. If you must enter a listing during the migration, it will be necessary to copy all tax data from the county auditor record. Auto-population of Realist tax data will not be possible during this time. MLS search and listing entry will not be directly affected. Only Realist, including auto-population of tax data, will be offline during this period. You may wait until Sunday and enter the listing when Realist auto-population is available to enter any new listings if you wish. Realist is being taken offline in addition to other CoreLogic software because CoreLogic is relocating their data center from Santa Ana, CA to Quincy, WA. This move will require almost 2 days of downtime. This will disrupt all Realist functions during the migration. Please be aware of this planned outage. Migration Timeline:
| ||||||||||||||||||||
|
MLS Taxes: Time to Update “Tax (Yrly)” and “Tax Year” It’s that time of year again to update your listings with the latest property tax information so they are reflective of the 2014 tax year. Most county auditors have updated their tax records to reflect the taxes owed for each parcel in their taxing districts for the 2014 tax year. Voter approved school and bond levies impact those figures usually each year along with any auditor reassessments or owner appeals of property valuation. Since most real estate taxes change annually, it is important that REALTORS®, clients and even sellers be kept apprised of these ever changing figures. Remember, while Realist can autopop the Yearly Taxes and Tax Year for you when you first enter the listing, it does not and cannot automatically update them for you when those figures change. Nevertheless, this routine remains an important manual operation for REALTORS® to complete the beginning of each year.
| ||||||||||||||||||||
|
MLS Policy Changes: Corp Limit Fees Reinstated, New Listing Entry, Curb Offers The MLS committee and Board of Directors have modified current MLS policy. The summary of these changes is below.
|