| ||||||||||||||||||||||||||||||||||||||||
|
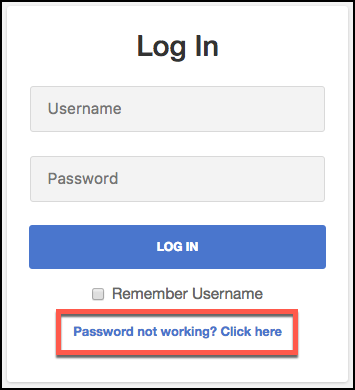
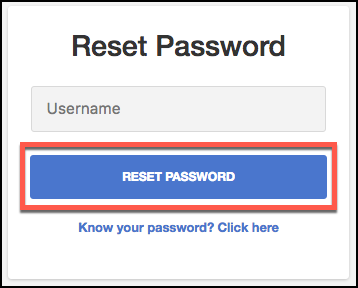
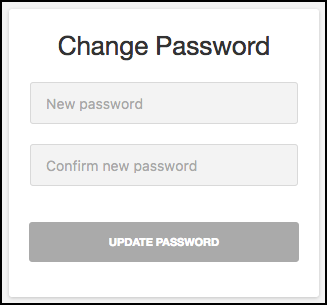
Coming 11/29/17: Flexmls Web: Improved Workflow to Change Password and Increased Password Security New update coming from our vendor to all systems using Flexmls (including us in Columbus). See details below: What is happening? In an effort to improve security, the process for resetting your password from the login screen will be more intuitive and user-friendly. Additionally, the minimum requirements for your Flexmls password are getting stronger. When you set a new password, it will require a minimum of 6 characters (containing at least one character and one number) and you will no longer be limited to using only 8 characters. WHEN WILL IT CHANGE Note: You will not be forced to change your password on November 29, and you can continue to use your current password, even if it does not meet the new minimum strength requirements. You will only be required to use a password that meets the minimum strength requirements when you change your password after November 29. WHO WILL BE AFFECTED Whether you are changing your password as a result of an MLS requirement to update it every few months or you’ve forgotten your password and are requesting a new one, the new password must be between 6 and 100 characters and contain a minimum of one number and one character. WHAT WILL CHANGE When changing your password, you will receive a prompt to meet these requirements if the new password you’ve entered doesn’t meet the minimum strength requirements. Request a New Password
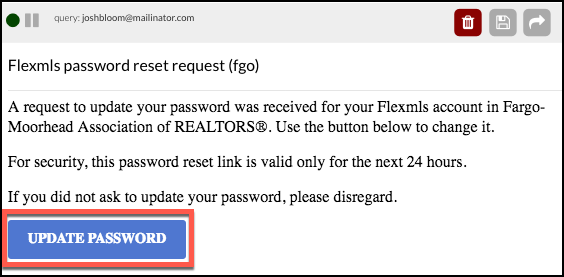
Check your email for a Password Reset Request and click the Update Password link.
Please note the following concerning the Update Password link:
· If you request multiple password resets, any one of the emailed links will work (or you can ignore them and choose to keep using your current password).
WHY ARE WE MAKING THIS CHANGE
| ||||||||||||||||||||||||||||||||||||||||
|
Realist Downtime: System Update – Thursday, Nov. 16 – 1:00am CoreLogic will install Realist version 1.17 on the morning of Thursday November 16th. Realist may be unavailable between 1:00 AM and 5:00 AM during the installation process. Two notable changes with this update: • Updates the Change Region with additional logic to display the most recent Sale Date in in counties where Recording Date data is not provided • Remove Bird’s Eye button
| ||||||||||||||||||||||||||||||||||||||||
|
Need Help? – Check out our training video selection! Training Videos – Getting Started with Flexmls COLUMBUS SPECIFIC TRAINING VIDEOS
Vendor Created Videos (FBS)
|
| Subscription Basics | 8 min- 11/19/2015 |
| Subscriptions 101 | 54 min- 12/8/2015 |
| Contact Management 101 | 53 min- 12/7/2015 |
| Listing Collections, Driving Directions | 20 min- 12/1/2015 |
| CMA Options in Flexmls | 51 min- 09/18/2015 |
Older, subject specific videos can be found here. Subject specific videos are also available by going to that section of the Flexmls system, then click the “Help” button in the upper right corner of the screen.
|
|
10/10/2017 |
On August 3, FBS will update the design of the contact information screens in Contact Management. This change is part of an ongoing initiative to modernize the look and feel of Contact Management to make it easier to use. The first change to the Contact Management page was released in June, updating the way the contact list appeared. This update changes the display when viewing a contact’s detailed information. Future updates will include additional design changes as well as enhancing functionality with new features.
NOTE: This update does not change existing functionality. Only the display and layout will change.
To view a contact’s information go to Contact Managment and select a contact.

The new contact information screen displays the contact’s name at the top of the screen and provides the same options you currently have. The first option is now called Contact Details.

The menu options are responsive to your screen size. On a wide screen, all of the options may display, but on a smaller screen you will see a More option. Clicking More opens a dropdown with the other available menu options.

The options to Edit, Remove, Deactivate, and Transfer the contact are at the bottom of the screen and are accessible regardless of which information tab you are currently on. If you don’t see these options, scroll to the bottom of the screen to access them.

To exit the contact’s information screen, click Close.
|
|
08/01/2017 |
The new redesign of the menu bar is here! If you have not yet configured your menu bar during the preview period, you will have been shown a video explaining the new features during your initial log in since the change. If you skipped or missed the tutorial video and documents, you can find and view them below:
View the Menu Quick Start Guide PDF
Original Announcement from May 25th, 2017:
===========================================
Big Flex Change in June: Customizable Menus
Soon you will have access to a new, easy to use menu in Flexmls. The new design provides a modern look, and allows one-click access to your favorite menu items. This update will be made available sometime in June. The new feature will be rolled out in waves in June. The exact date it will appear in Columbus is yet to be determined.
Initially, the new menu will be optional, so you can choose to turn it on or choose to continue using the old menu. After 30 days, the new menu will no longer be optional; all users will be moved over to the new menu.
Turn on the New Menu
When the new menu is available, you will receive an invitation to turn it on when you login to Flexmls. If you don’t turn it on immediately, you will be able to click the Use the Customizable Menu button to turn it on. You can also click the What’s this? link to access more information about the custom menu before you decide to turn it on.

When you turn the menu on, you’ll answer a question about your role: are you an Agent, an Appraiser, etc. Your response will determine the default items on your Favorites bar.

When setup is complete, you’ll see a Menu button and your Favorites.

Menu
Click on Menu to see the fully expanded menu. All the menu items are here in the same groups and in the same order as the old menu. Click a menu item to go to that feature. For example, click Quick Search to start a new search.

Type into the search box (“Search the menu…”) to easily find a menu item. For example, if you type “sav” in the search box, the menu will bring the Saved Searches link to you. Click the link to go to Saved Searches. It’s faster than looking through the whole menu.

To exit the full menu, click Menu again.

Add and Remove Favorites
Favorites give you one-click access to features you use the most. You can easily add, remove and rearrange Favorites to match how you work.
To mark a menu item as a Favorite, open the Menu, hover your mouse over an item and a Favorite star will appear. Click the star to create a one-click shortcut to it on the Favorites bar.

If you want to remove an item from your Favorites, click on the star next to an existing Favorite. The item is instantly removed from your Favorites and the star changes to an outline.

If you have more menu items in your Favorites than can be displayed on your screen, there will be a More link in your Favorites. Click More to access your remaining Favorites.

Reorder and Remove Favorites
To rearrange the order of your Favorites or remove an item from your Favorites, click the Reorder link on the menu bar.

Click and hold a menu item to drag and drop it into a new order.

You can also remove an item from your Favorites by clicking Remove. Click Save when you are done managing your Favorites.
|
|
07/27/2017 |
On June 13, you will be able to see more contacts at once on the Contact Management screen.
Select Contact Management from your menu and you will see your contact list fill the entire screen.

Click a contact, and a popup containing all of that contact’s information will appear. Select a specific tab to view and edit information for that contact. Click the Close link to close the contact and return your contact list.

|
|
06/09/2017 |
On June 12, the Hot Sheet in Flexmls Mobile Web will have an updated design based on the Hot Sheet in Flexmls Pro, providing you with a more consistent user experience across platforms.
Just as before, tap the Hot Sheet icon to go to the Hot Sheet. Tap Filter to change the search criteria for listings to include in the Hot Sheet.

Filter by specific locations, set the Time Frame (Today, Past Two Days, Past Three Days, or Past Week), and select the specific property types you would like to include. Click View Events to view the the results.
The same Filter options will be applied the next time you run the Hot Sheet from the same device.
|
|
|
On May 30, 2017, Flexmls CMAs will have a new look and several improvements. The changes will include:
- New Design– the new format includes larger text, photos, and maps;
- New Charts – two new Price Analysis charts are available: List, Sold and Adjusted Prices and Low, Average, Median and High Prices;
- Automatic PDF – to ensure optimized appearance for printing and emailing, the CMAs will be automatically created as PDF files when possible.
NEW DESIGN
When you create CMAs in Flexmls, they will display a larger photo of the subject property, a larger map, larger font, and updated color schemes for the headers and text. These changes are intended to make your CMAs more readable, attractive, and professional looking.

Just as before, you can adjust the color scheme on the Finish tab. With the new design, the color scheme controls the color of the headings, headers, and footers–the background will remain white.

NEW CHARTS
There are two new Price Analysis charts available that provide a quick, visual comparison of price statistics: List, Sold, and Adjusted Prices and Low, Average, Median and Low, Average, Median, and High Prices. These charts can be added to the CMA on the Finish tab if Statistical Summary is checked. To include the charts in your CMA, check the Display Charts option.
List, Sold, and Adjusted Prices
The List, Sold, and Adjusted Prices chart will only display if you’ve included Closed listings in your comps. It shows the List Price, Sold Price, and Adjusted Price for the first eight closed comps (as arranged in the Comps tab). If you do not have any adjustments, the Adjusted Price data points will reflect the listing’s Closed Price.
If your CMA includes Low, High and Recommended Price for the subject property, they will also be shown on the chart.

Low, Average, Median, and High chart
If your CMA includes Closed listings, the Low, Average, Median, and High chart will show Sold Price statistics for the comps that are Closed in relation to the Low, High, and Recommended List Price for the subject property.

Please note, if your CMA does not include Closed comps, the chart will still display. It will include List Price statistics for Active comps only. If your CMA does not include Closed or Active comps, the chart will display List Price statistics for all comps.
AUTOMATIC PDF
The CMA report will be delivered in PDF format when possible to provide consistent appearance. This helps solve the problem of inconsistencies among browsers, printers and operating systems in how they print web pages. In PDF format, the CMA you present to your clients will look the same as the CMA you email to them.
When there are too many comps in a CMA to generate and deliver a PDF report, the report will be delivered as a web page that you can print or email. Note that some browsers (e.g. Edge and Chrome) are able to save web pages as PDF documents for download to your computer.
|
|
05/25/2017 |
As of May 15, 2017, you are able to search for contacts when sending manual emails. This makes sending manual emails easier by eliminating the need to scroll through long lists in order to find specific contacts.
The lookup bar appears on the manual email screen. Use the lookup to find contacts or click the Add New Contact button to create a new contact.

If you click in the contact search box without typing, a list of all of your contacts will appear and you can scroll through to find and select specific contacts.

Start typing a contact’s name or email address into the search bar to search for a specific contact. Click the contact to select them as a recipient.

If a contact has multiple email addresses, each address will appear separately.

If you are working on behalf of a contact who has more than one email address and you manually email listings to them, all of their email addresses will be selected by default.

If you would like to remove a recipient, click the X next to the email address you’d like to remove.

|
|
|
On June 1, 2017, you will be able to search for existing contacts when saving a search. This will make selecting a contact easier by eliminating the need to scroll through a long list in order to find specific contacts.
The lookup bar will appear when you save a search and select the option for Existing Contacts. Use the lookup to find contacts.

If you click in the contact search bar without typing, a list of all of your contacts will appear and you can scroll through to find and select specific contacts.

Start typing a contact’s name into the search bar to search for a specific contact. Click the contact to select them as a recipient.

If you would like to remove a recipient, click the X next to the email address you’d like to remove.

If a contact has multiple email addresses, only the contact’s primary email address will appear in the search results. This is because the search is being saved to the Contact’s record in Flexmls not to a specific email address. If you choose to Save and Add Subscription, the subscription will be sent to all email addresses that are set to receive notifications for the selected contact.
|
|
|